Create 3D Text Surrounded by Flame in Photoshop
Note: The Photoshop tutorial is done in Photoshop CC – therefore some screenshot may have slighting different layout as in the earlier version. Some brushes are exclusive to Photoshop CS6.
Here is a preview of the final effect I have for this tutorial: (click to enlarge)
To complete this tutorial, you will need the following stocks:
Step 1
Create a new document sized 1400px * 782px with black background. We will start by preparing some ground texture with the crack texture we download.
Let’s load this texture into Photoshop and select a portion of it:

Copy and paste the selection over to our document and use the free transform tool to perspective this selection:

Use a soft eraser tool to fade the edges of this texture as shown below:

Add the following 2 adjustment layers as clipping masks to this ground texture layer:
Levels

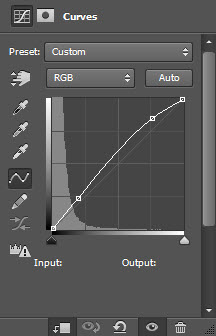
Curves

and here is the effect so far:

Step 2
We will add some more crack textures on the back to support our text. We can go back to the crack stock image and select the entire image:

Copy and paste the selection over to our document. Re-size this new layer to fit our document and reduce its layer opacity to around 70%:

Use a soft eraser to fade its edges as shown below:

Apply the following 2 adjustment layers as clipping masks for this new crack layer:
Levels

Curves

and here is the effect so far:

Step 3
If you use an earlier version of Photoshop and don’t have the 3D function, you can download this PSD file here which has the rendered 3D text.
If you do have CS6 or above, use the font we downloaded and the 3D function to render the following text “FLAME”:

Select the text:

Move the selection to our cracked ground image and copy the selection:

Paste the selection over to our text, then use a soft eraer to remove some parts of the texture so that not all letters are covered:

Load the flame stock image into Photoshop and repeat the above process, and copy a selection of fire:

Paste the selection to our text and set the layer blending mode to “Hard Light”:

We can duplicate the 3D layer once and move it above all the texture layers:

Set the layer blending mode of the duplicated tex layer to “Overlay”:

and here is the effect so far:

Step 4
We will add the surrounding fire to our document. Use the Lasso Tool (set to 40px feather) to select a portion of the flame stock image:

Copy and paste the selection to our document, then apply the following unsharp mask filter to sharpen the flame a bit:

Set the layer blending mode of the flame layer to “Screen”:

Attach the flame to our text, also add some more fire elements around the canvas, as shown below:
Step 5
We’re almost done! To fine-tune the effect, I added a color balance adjustment layer on top of all layers:


Add some extra fire elements to the text as shown below from the flame stock image:

and here is my final effect: (click to enlarge)
That’s it for this Photoshop tutorial! Hope you enjoy it and find it somehow useful. Drop me a comment if you have any questions. Till next time, have a great day!


0 comments:
Post a Comment