Born of the Dragon – Create this Symbolic Gothic Composite in Photoshop
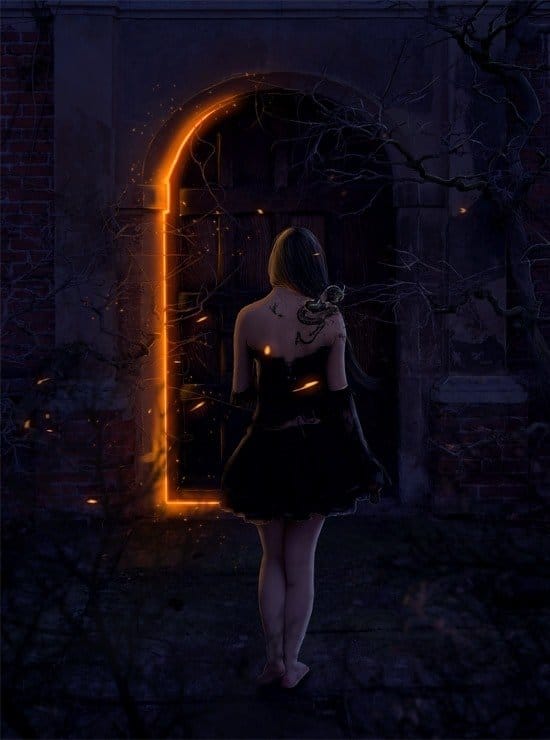
In this tutorial you will learn, how to make this gothic and symbolic photo manipulation. I’ll show you basics of Photoshop, like making night or create lights and shadows. You can read extra tips about photo manipulations and you will learn, how to make living tattoo! You will be making better photo manipulations and works in the future, by reading this.
What you’ll be creating
You will be creating photo manipulation fulfilled with symbols – like fire, night and dragon. Everything here is a symbol of transformation. You will be playing with particles and fire :). You’ll need Photoshop CS5 or newer to follow this tutorial.
Tutorial Resources
- Dragon Pack 1 – Lill-stock
- Creepy Door – AustriaAngloAlliance
- painting the nail blister – ScaryStock
- Hanging Branches 02 – Alz-stock
- Wicked 16 – Noree-stock
- Debris Brush Set – Zigabooooo
- Debris Brushes – Dacmaniac
Step 1
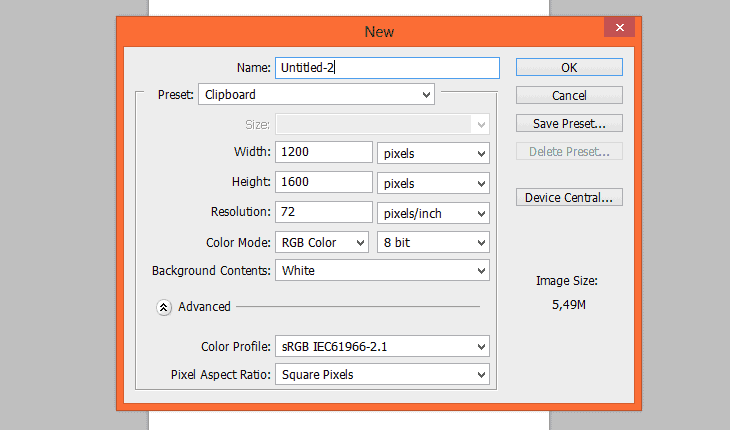
Let’s start. Choose from top menu File > New (or Ctrl + N), create 1200 x 1600 pixel document.
Step 2
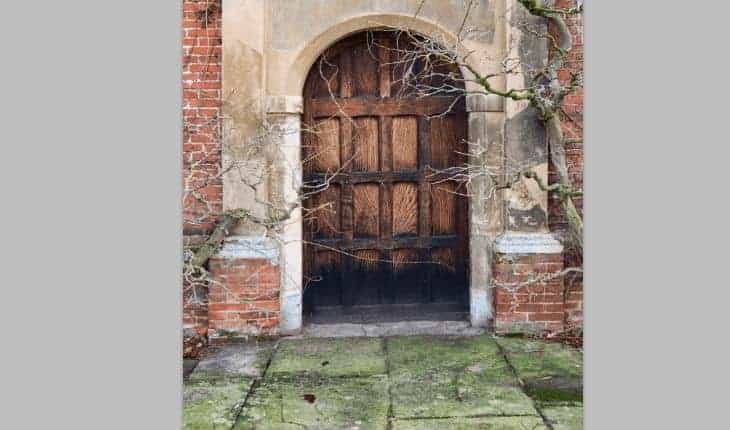
Drag and place “Creepy door” stock to your file. Transform it as shown below.
Step 3
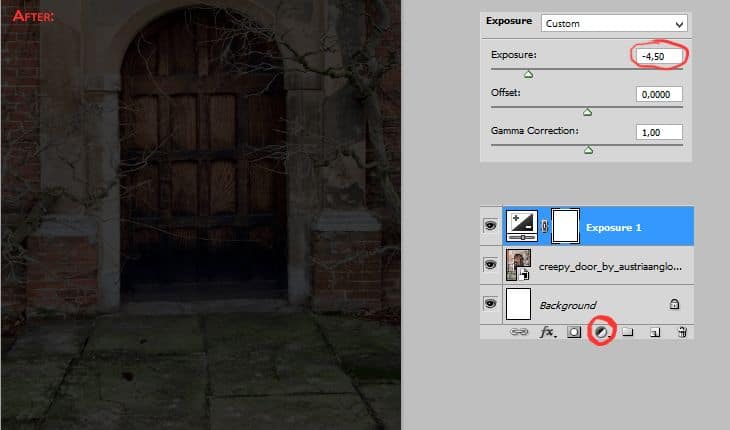
Now you will make night scene. Start from creating adjustment layer (marked shortcut or Layer > New Adjustment Layer) and pick Exposure.
Step 4
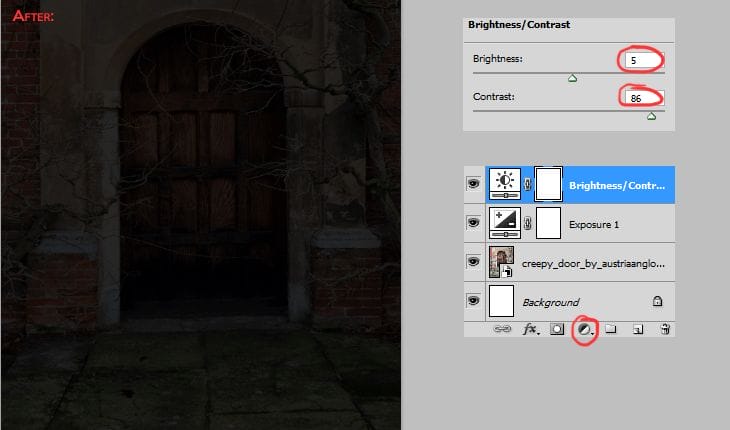
Colors in the picture are flatty. For fixing it add adjustment layer with Brightness/Contrast (marked shortcut or Layer > New Adjustment Layer > Brightness/Contrast).
Step 5
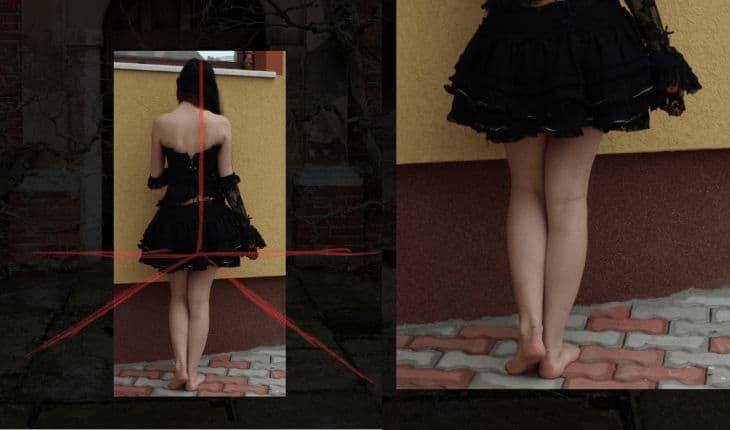
Now drag and drop to your file model stock – “Wicked 16″. Remember about proportions – she can’t be taller than the doors! :) Also, keep in mind the perspective. The model has to be placed lower than door line.
Step 6
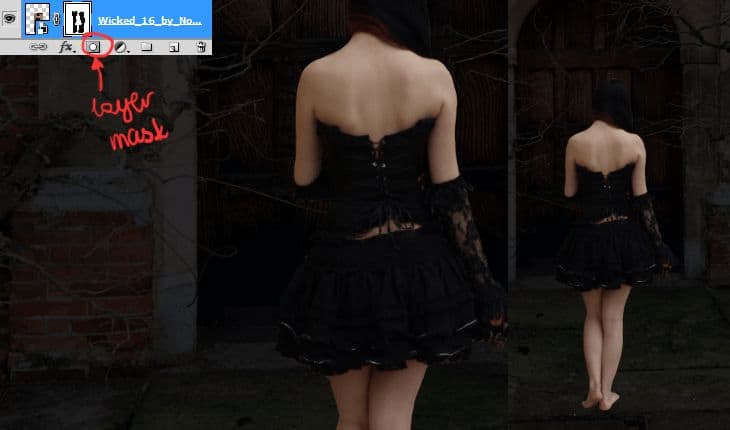
Add layer mask by shortcut. Mask background from model stock.
Step 7
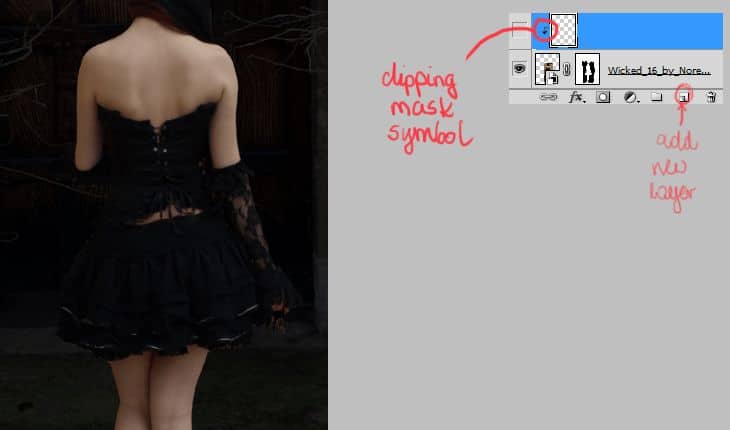
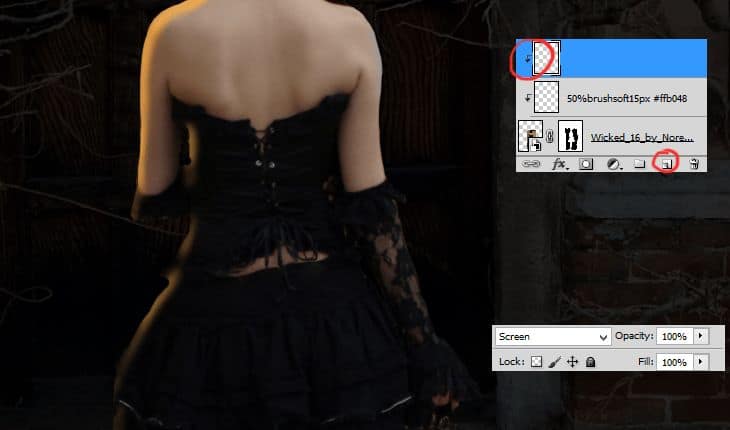
Add new layer (Shift+Ctrl+N, Layer > New > Layer… or marked shortcut). Click on the created layer with RMB. Choose Create clipping mask. Clipping masks use the contents and transparency of a layer below.
Step 8
Pick soft, 15px, orange brush, set its opacity to 50%. With gently strokes draw lights of your model on created, clipping layer. I’ll set light source from doors, by the left side of picture.
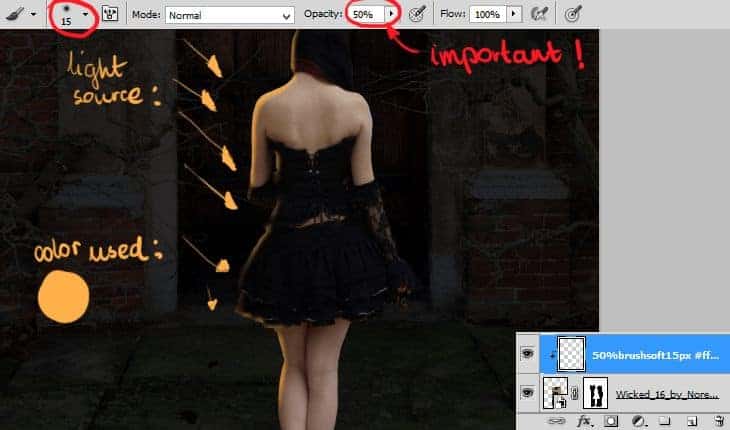
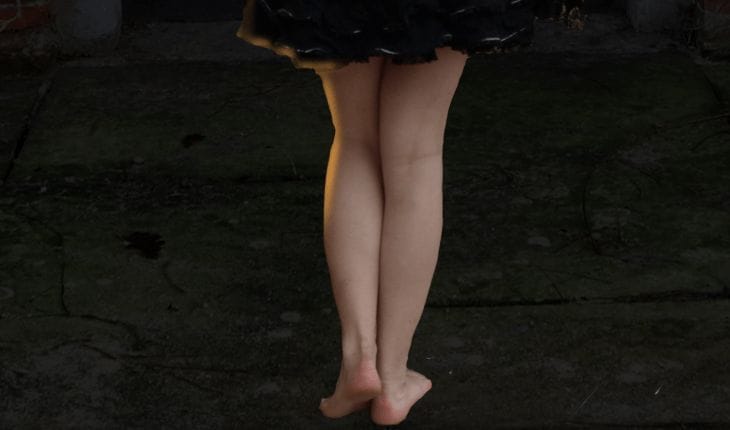
Extra tip! If you making photo manipulation with full body model, try to make legs a bit darker, because our eyes are focusing on lighter parts of picture. That’s why I haven’t made lights on bottom of her legs.
Step 9
Add new layer (Shift+Ctrl+N, Layer > New > Layer… or shortcut). Click on the created layer with RMB. Choose Create clipping mask – like before. Then, set blending mode of this layer to Screen!
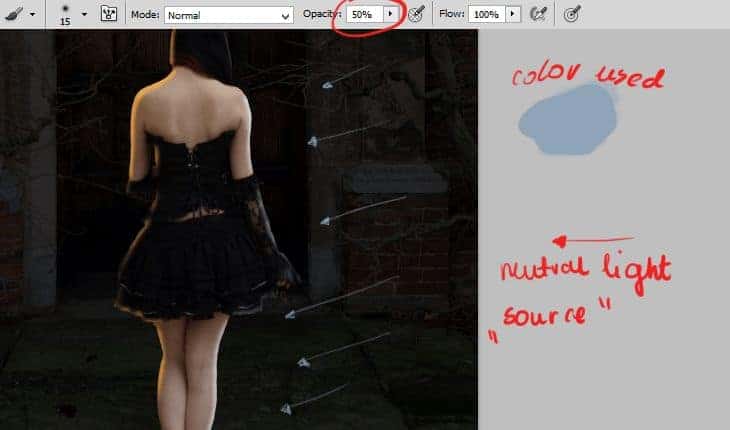
Then, with soft, 15px, light-blue (set its opacity to 50%) brush gently draw neutral lights on right side of the model. Neutral lights will give your image more realistic look. You can notice neutral lights in photography or drawings. Remember, that neutral lights are darker, than normal lights.
Step 10
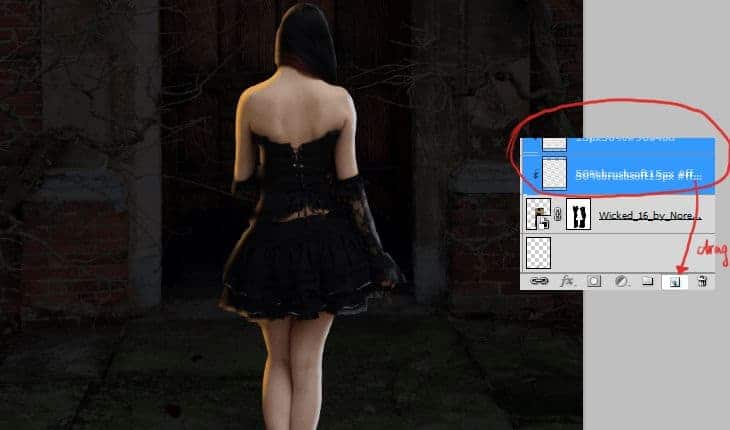
Cool! Now you will copy two layers with lights. Choose layers by holding ctrl. Then, drag layers on “New layer symbol”.
Step 11
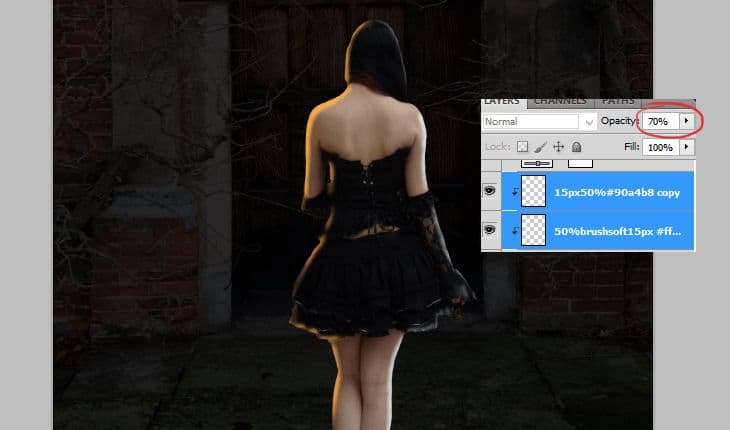
Now, again click with holding Ctrl duplicated layers. Decrease opacity of marked layers to 70%.
Step 12
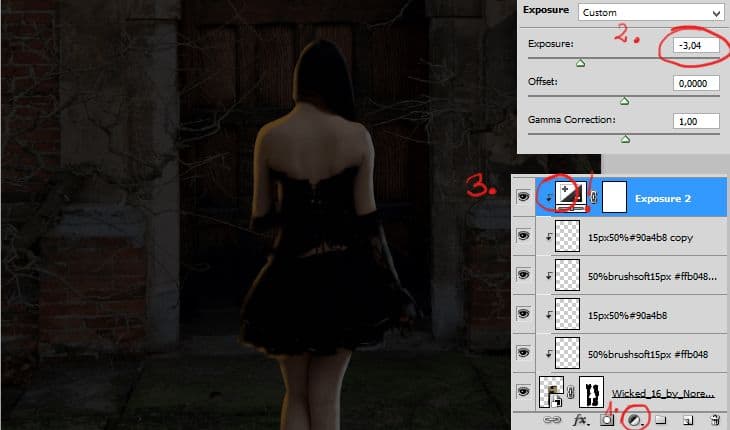
Time to set exposure of model. Add adjustment layer with Exposure (marked shortcut or Layer > New Adjustment Layer > Exposure). Set it as shown. Then, click on created layer by RMB. Choose “Create clipping mask” – Adjustment layer will fill only model’s layer.
Step 13
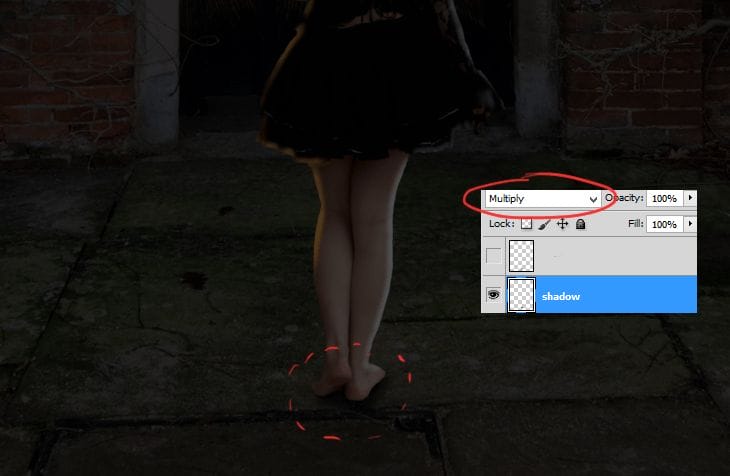
Back below model’s layer. Add new layer. Pick big, soft, gray brush and draw some shadows below feet. Then, use smaller brush with darker color and draw darker shadows. If you aren’t glad of your effect, just blur it. This is optional, but shadows will be smoother. Avoid use black color (#000) – it’s not naturally occurring.
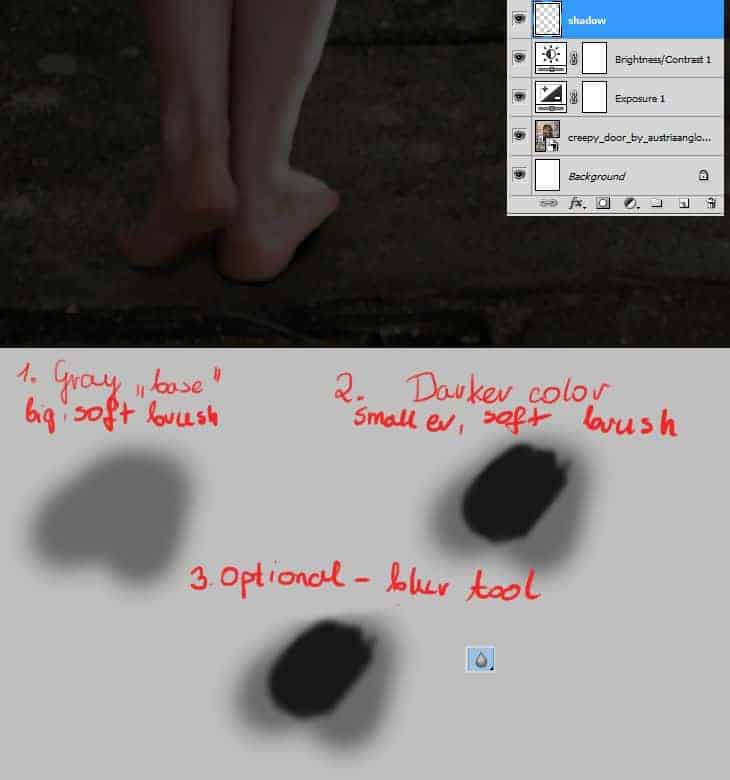
Now, change blending mode of shadows layer to Multiply.
Step 14
Add new layer with shadow. Use big, soft, gray brush and draw something like triangle.
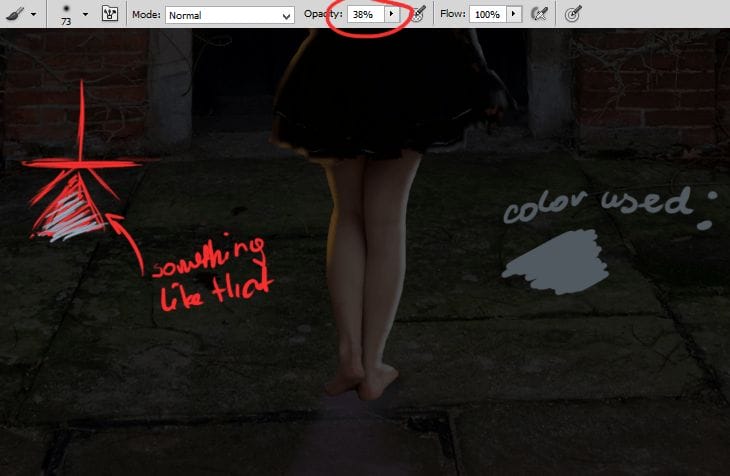
Like before, change blending mode to Multiply – it’s great mode to whole shadows! :)
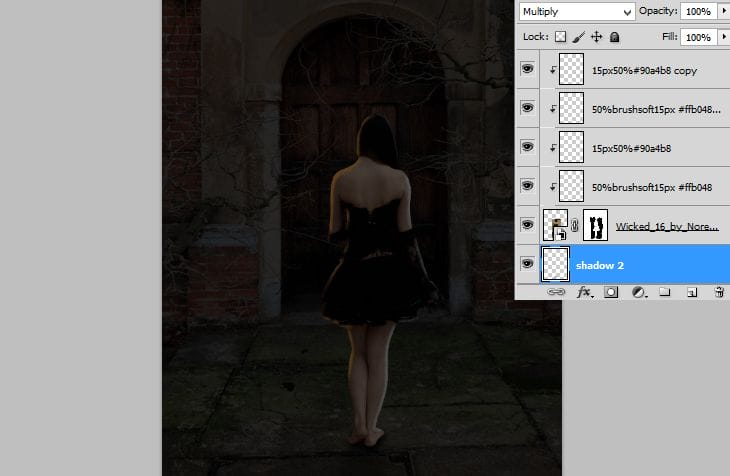
Step 15
Night isn’t ready yet. You should add night colors to your image. To create this effect, add adjustment layer with Color/Balance (marked shortcut or Layer > New Adjustment Layer > Color/Balance).
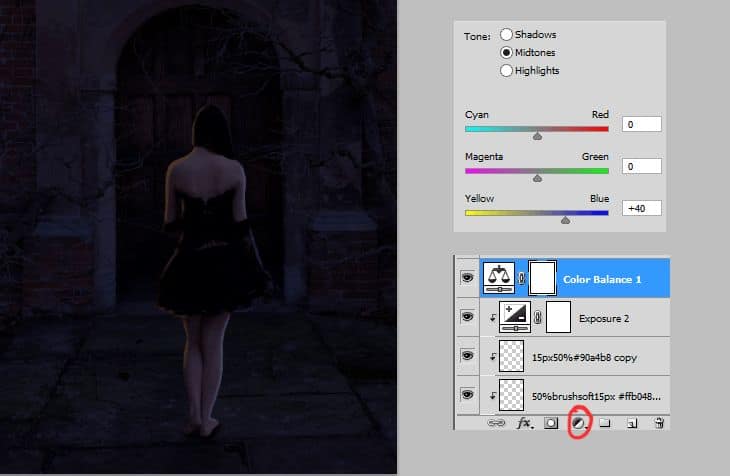
Step 16
Add new layer (Shift+Ctrl+N, Layer > New > Layer… or marked shortcut). Pick big, orange brush. Draw glow of your light source. Door’s line will guide you! :).
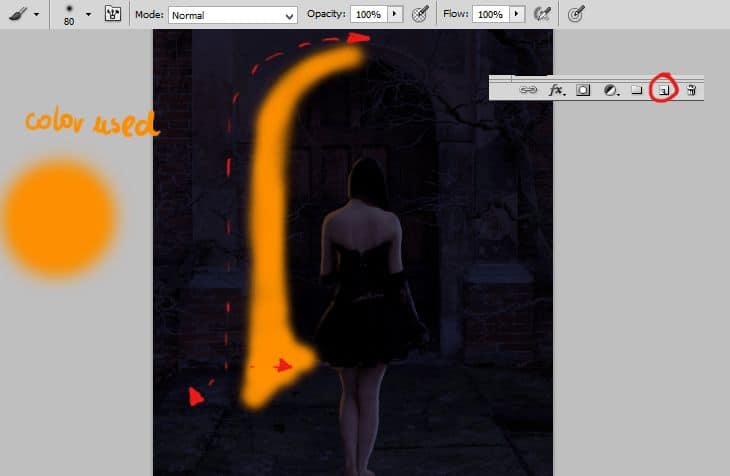
Step 17
It should be glow, not something solid. To fix that, choose from top menu Filter > Blur > Gaussian blur. Set it as shown.
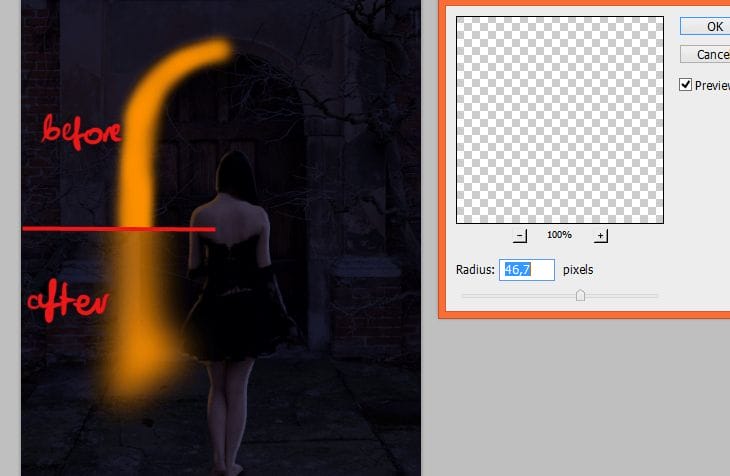
Change blending mode of created layer to Soft Light. It will gently lighten your work.
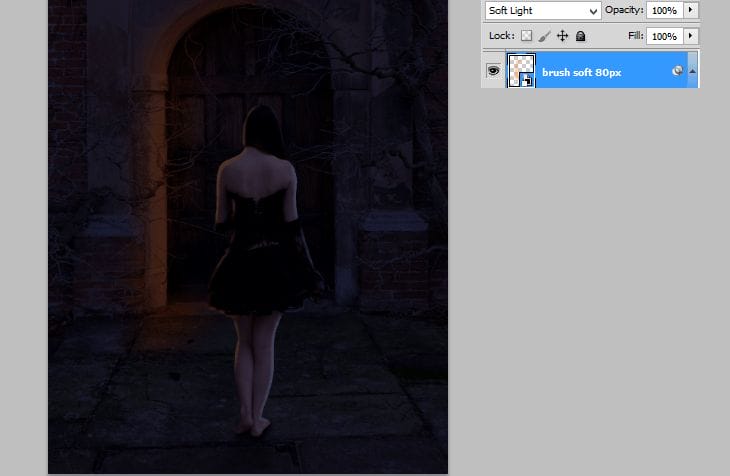
Step 18
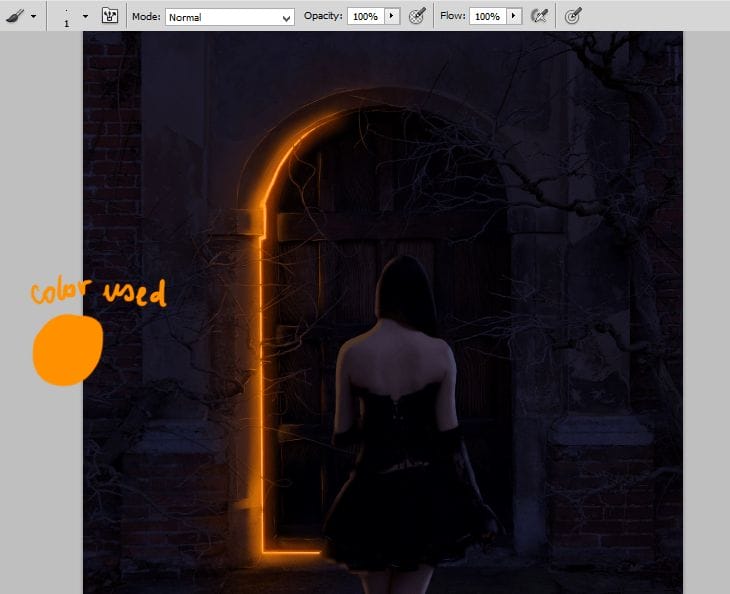
Add new layer (Shift+Ctrl+N, Layer > New > Layer…, or shortcut). Now you should create true light source. In my vision behind doors is fire. And whole room is burning. I used 7px hard round brush (#f9d77b color, pressure size) for drawing it.
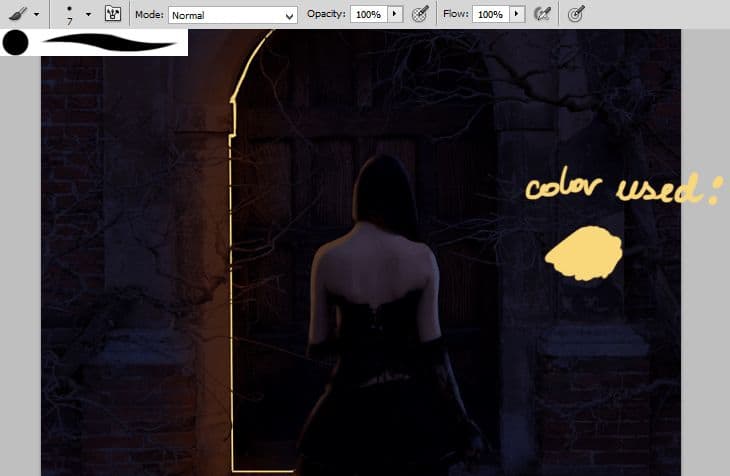
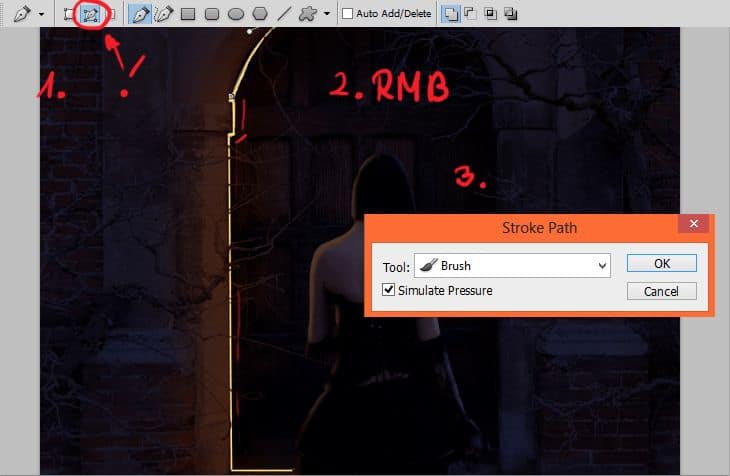
If you don’t have pen tablet, you can use pen tool. Set brush, like in step 18. Use pen tool to project desired shape. Then, click RMB, choose stroke path and check simulate brush pressure. You don’t have to project whole lines at once. You can do this on other layers, then merge it.
Step 19
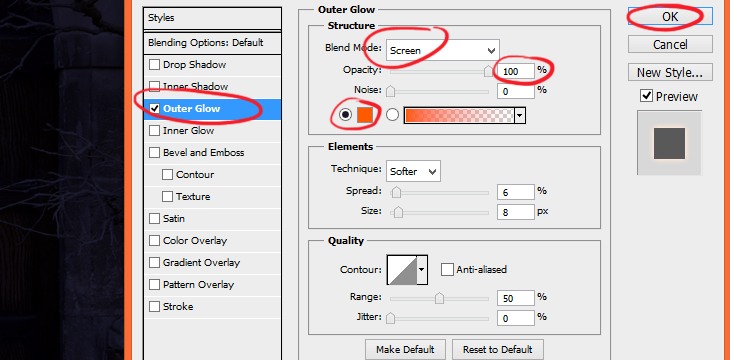
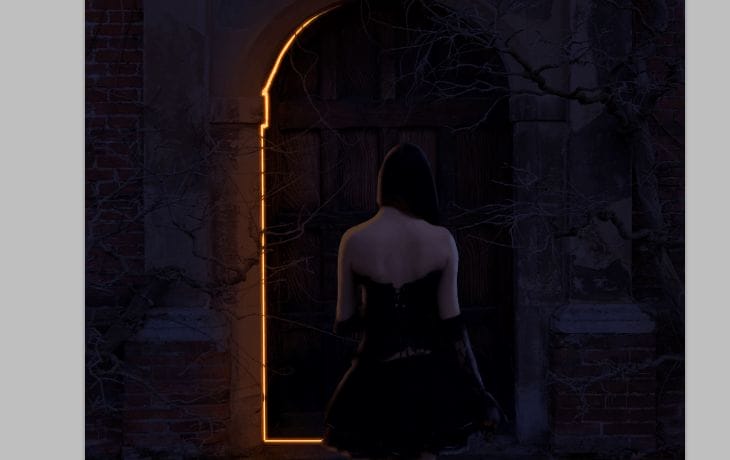
Cool! For make created layer more realistic click on it with RMB. Then, choose blending mode from menu. Go to “Outer glow” settings.
Step 20
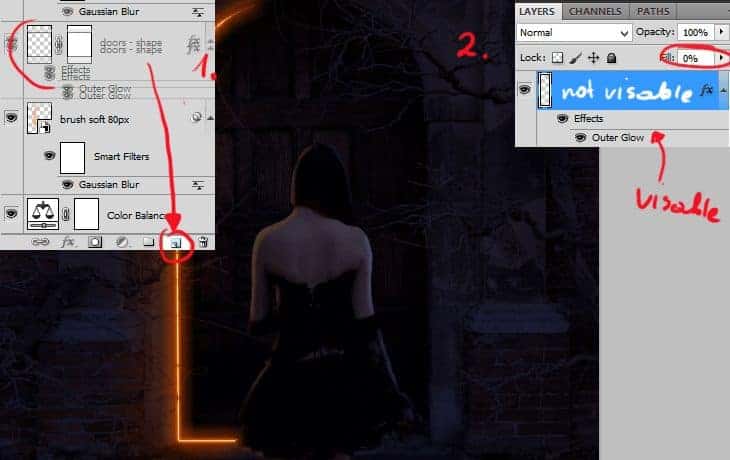
Duplicate created layer. Choose and drag it on new layer symbol. Then, set “Fill” to 0%. If you decrease “Fill” like here, layer will be transparent, but her effects (here: Outer glow) will be still visible.
Step 21
Now from top menu choose Filter > Blur > Gaussian blur. Set it as is shown.
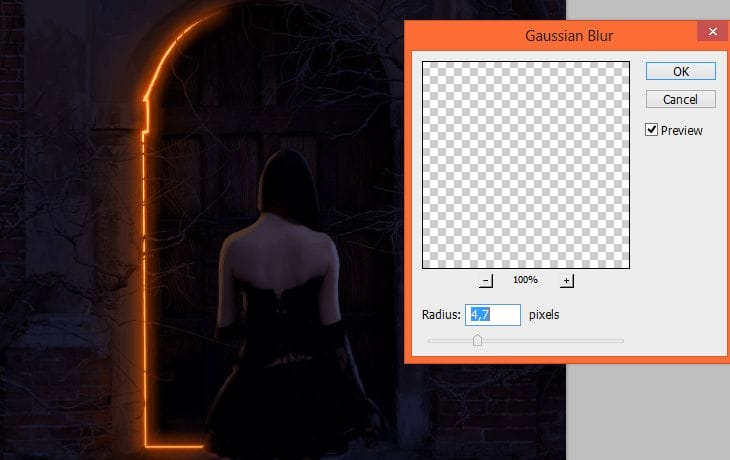
Step 22
Create new layer (Shift+Ctrl+N, Layer > New > Layer…, or shortcut). Pick 1px soft round orange brush. Draw lights on branches. Just follow its line.
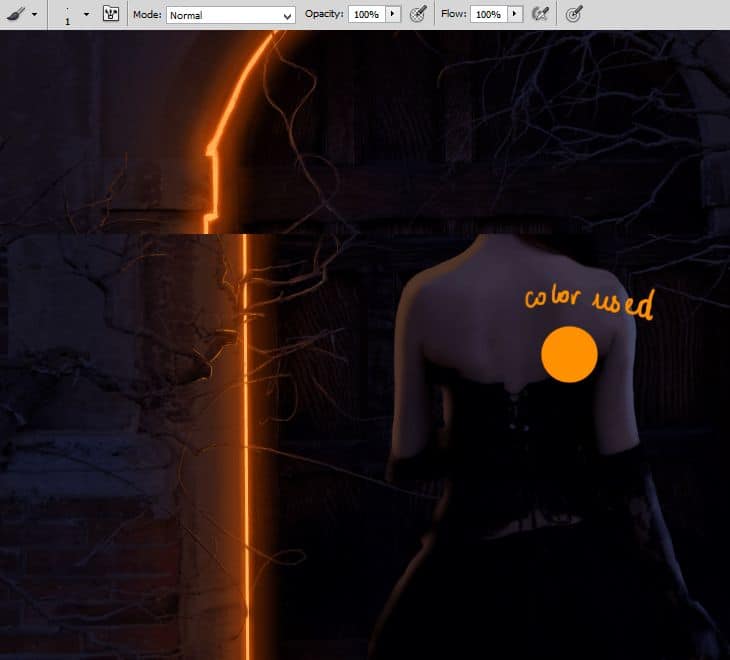
Step 23
Light also goes on doors and column at left side. You should mark it. Add new layer (Shift+Ctrl+N, Layer > New > Layer…, or shortcut). Pick 17 px soft brush. Use the same color as before.
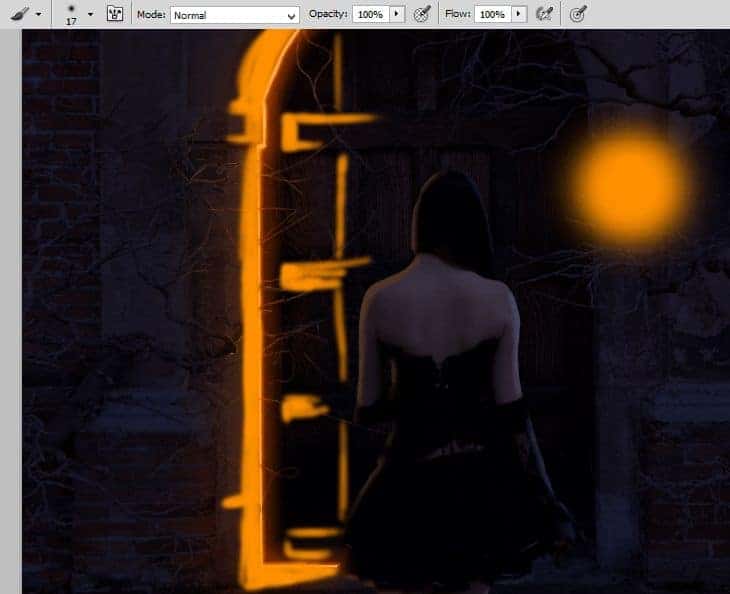
Step 24
Add mask to created layer. Pick bigger brush and mask unwanted lights.
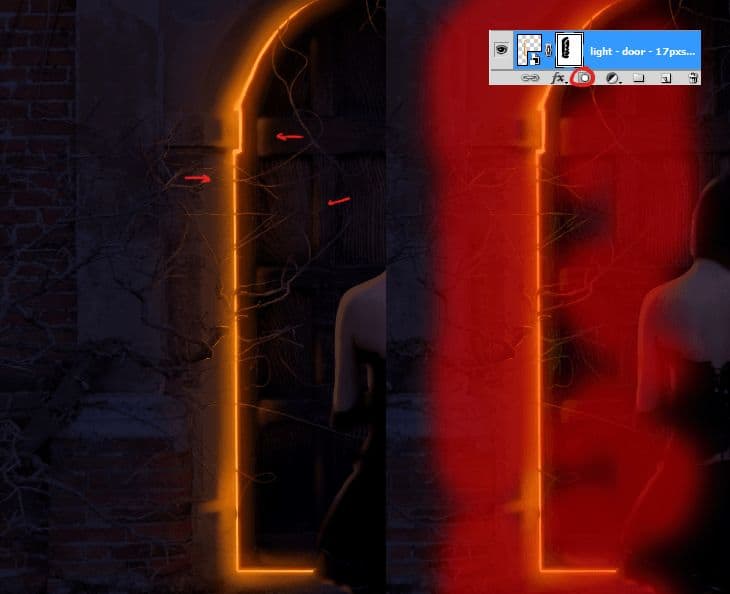
Step 25
Again create new layer. With the same brush settings as in step 22 draw lights on doors and column. Follow the edges of those things.
Step 26
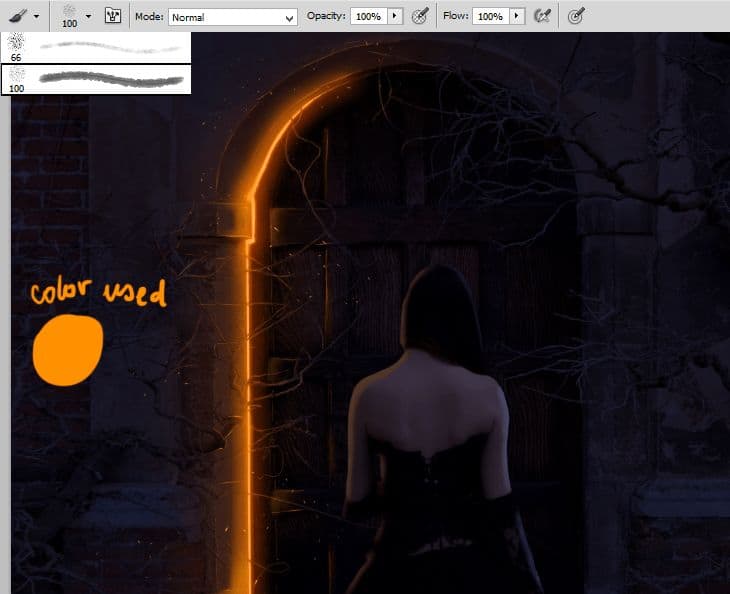
Now you’ll make sparks. Just add new layer and draw randomly dots near the light source. Also, for this, you can use any kind of “debris” or “dust” brushes, or just use preset brush from Photoshop – as shown.
Step 27
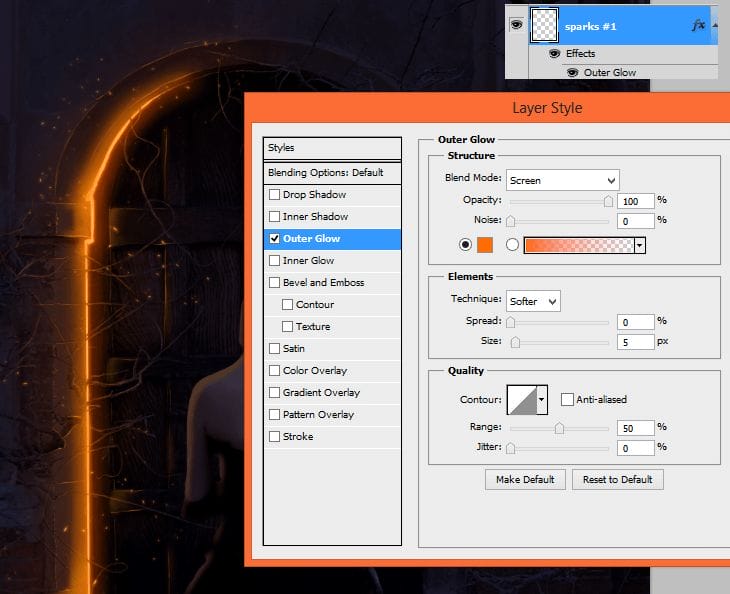
If you like effect, you created, click with RMB on this layer. From menu choose Blending options. Go to “Outer glow”.
Step 28
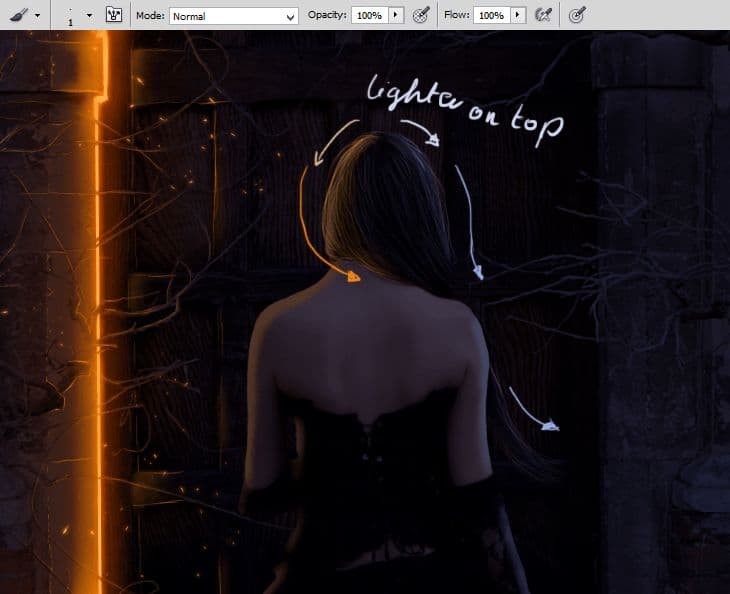
For creating hair, add new layer. Pick 1 px soft brush and draw hair strands. Try to flow with your image. I used colors from light orange (right side) to light blue (left side).
Step 29
Drag and place to your file crack texture. From transform menu (top bar) click on “Warp mode”. Transform it as shown.
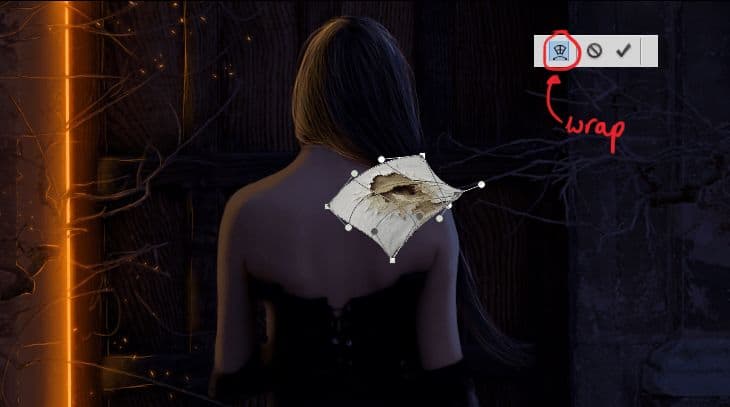
Change blending mode of this layer to “Multiply”.
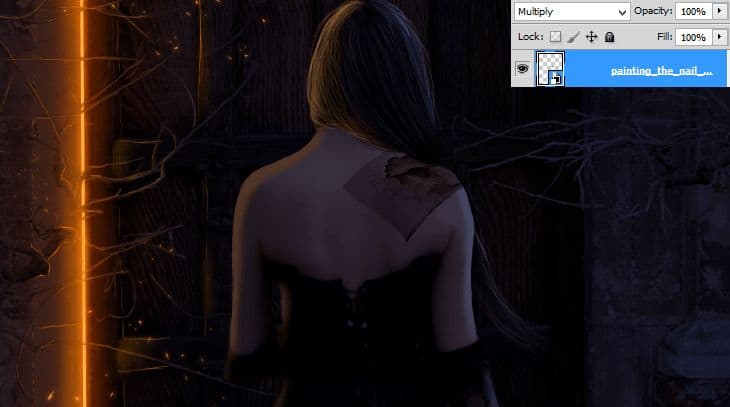
Step 30
Add mask to this layer by shortcut. Use soft brush to erase rough edges.
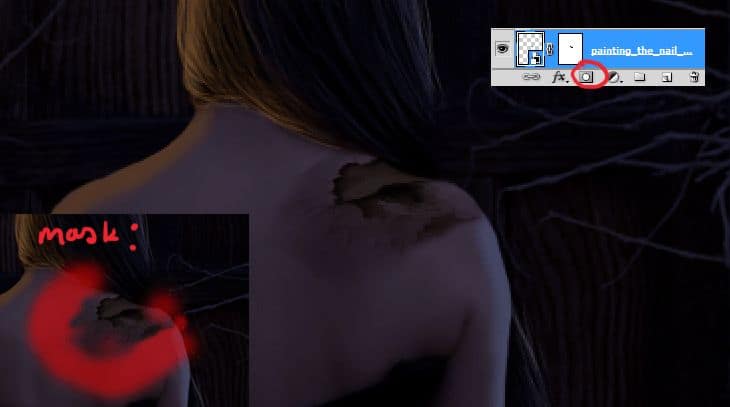
Step 31
You’ll adjust this texture. It is beige and really don’t fit to whole picture. Add adjustment layer with Hue/Saturation (shortcut or Layer > New Adjustment Layer > Hue/Saturation). Then, click on this layer with RMB. Click “Create clipping mask”.
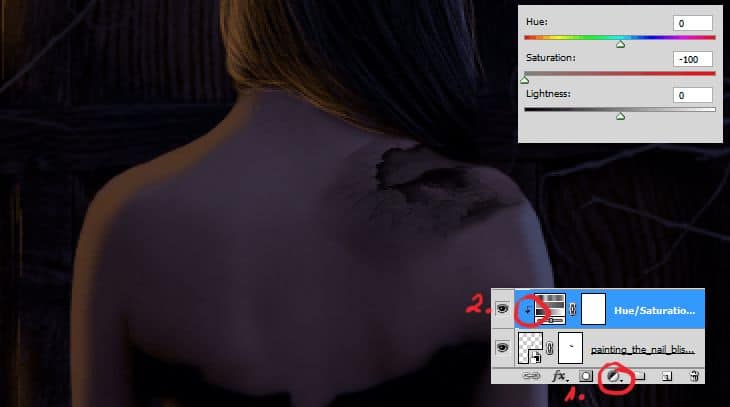
Step 32
For more dramatic crack, add Brightness/Contrast adjustment layer (shortcut or Layer > New Adjustment Layer > Brightness/Contrast). Then, click on this layer with RMB and choose “Create clipping mask”.
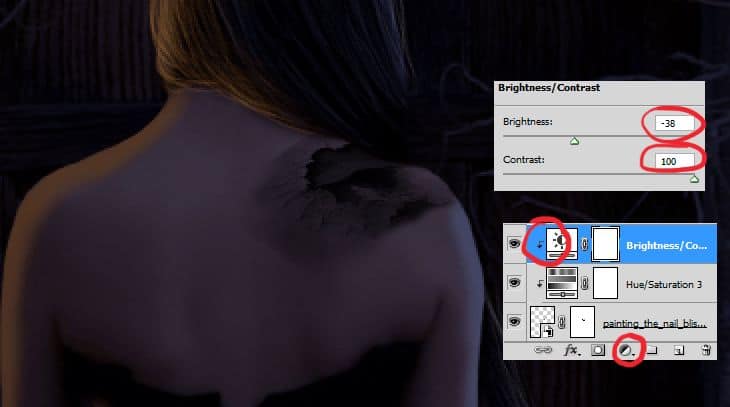
Step 33
Now you’ll blend crack texture with skin by Brightness/Contrast adjustment layer. Also with clipping mask.
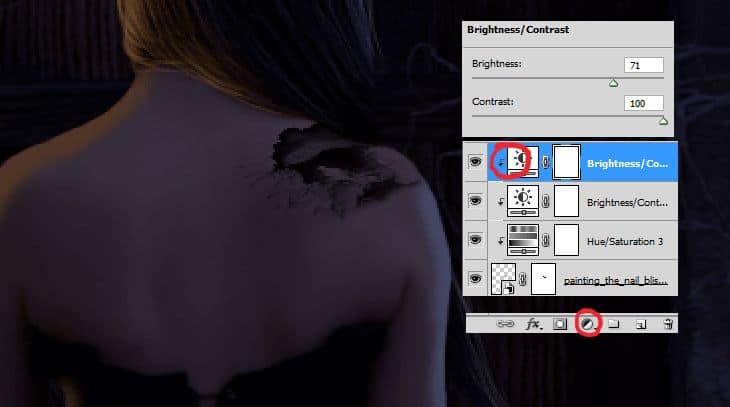
Step 34
Place “Dragon stock” to your image. Transform it as is shown.
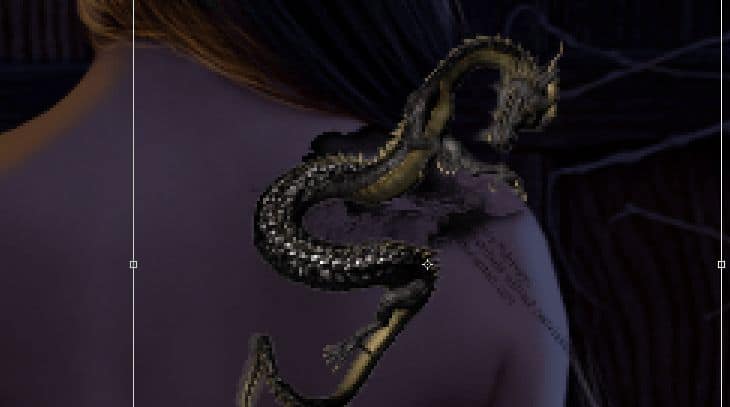
Step 35
Mask unwanted parts of stock.
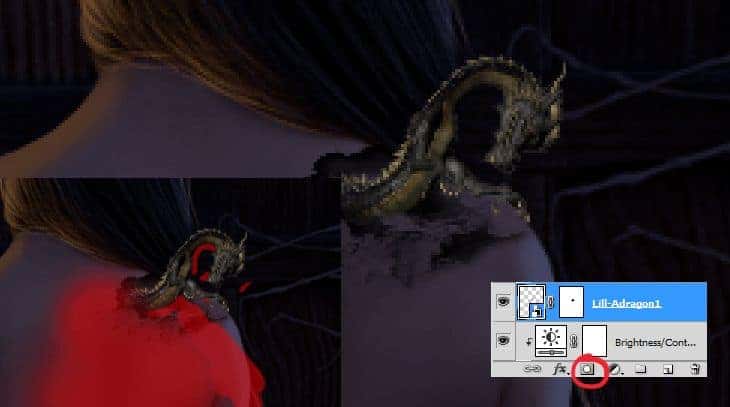
Step 36
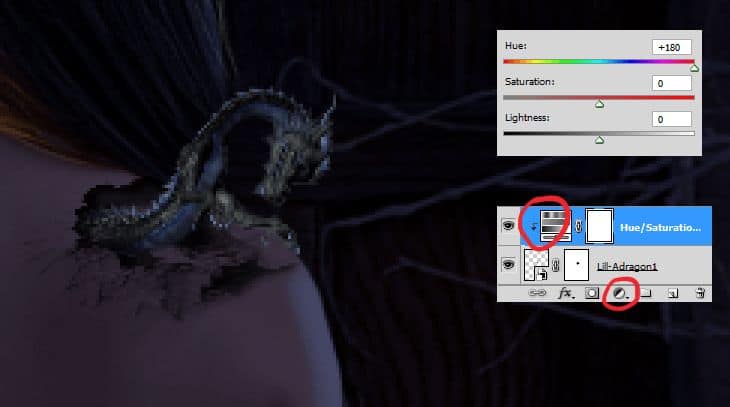
Cool. I think, that hue of dragon’s scales isn’t good at the moment. For fixing it add Hue/Saturation adjustment layer (shortcut or Layer > New Adjustment Layer > Hue/Saturation), and set it as shown. Then click on Adjustment layer with RMB and choose “Create clipping mask”.
Step 37
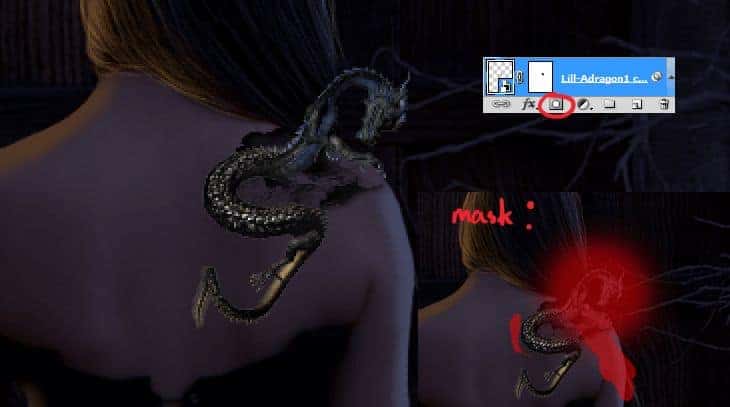
Now you will create her tattoo. Place and mask dragon stock.
Step 38
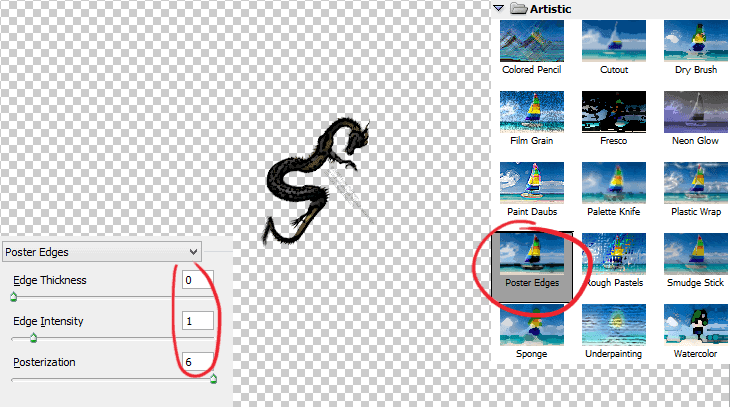
You are the best! :) Now go to Filter > Filter gallery. Click “Poster edges”, then set it as is shown. This effect posterizes whole layer and draws its edges to black (Like ink! :]).
Step 39
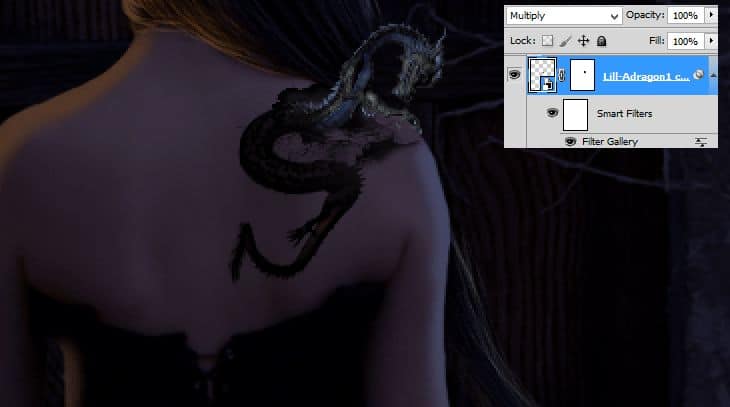
After that, change blending mode of dragon’s layer to Multiply.
Step 40
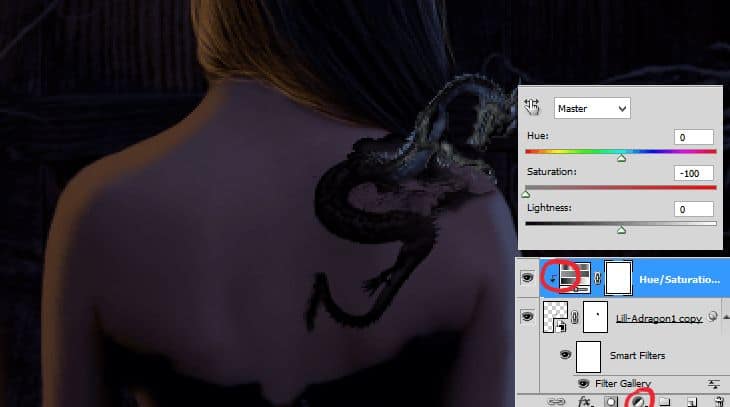
Three next steps are optional – it depends of your vision of tattoo. Add Hue/Saturation adjustment layer (shortcut or Layer > New Adjustment Layer > Hue/Saturation), and set it as shown. Then click on Adjustment layer with RMB and choose “Create clipping mask”.
Step 41
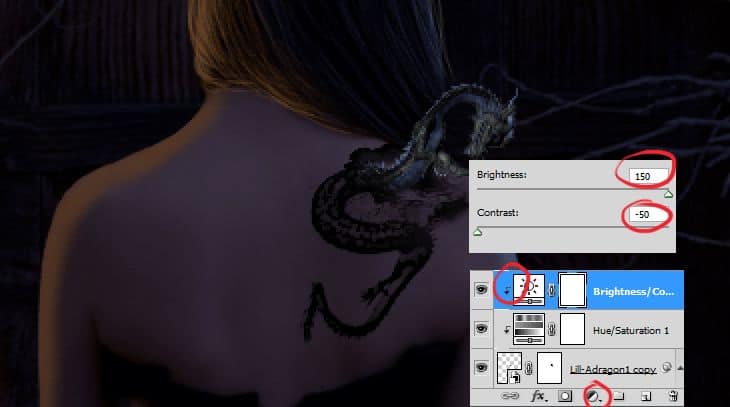
Add Brightness/Contrast adjustment layer. Create clipping mask.
Step 42
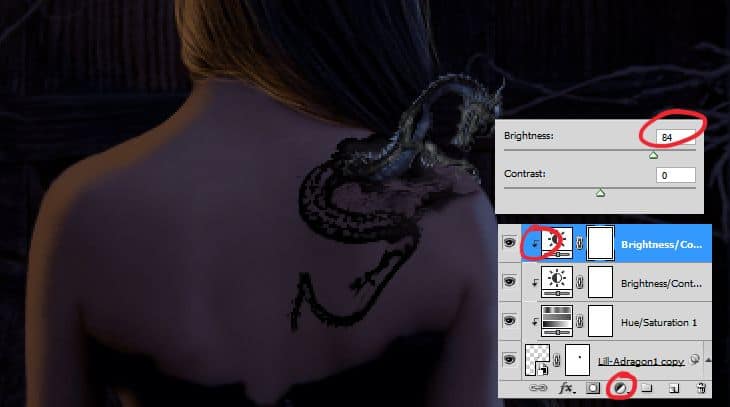
Add again Brightness/Contrast layer. Also create clipping mask.
Step 43
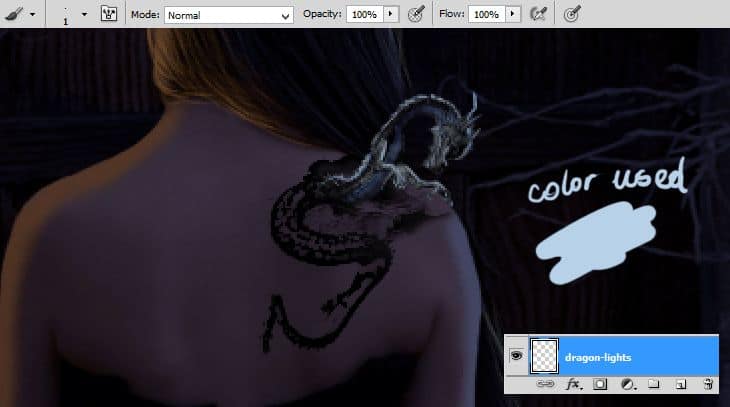
Now you should add lights on dragon. For making it, add new layer (Shift+Ctrl+N, Layer > New > Layer…, or shortcut). Pick 1px soft brush and draw outline of light on his back and head. I used light-blue color, because dragon is on “neutral light” field.
Step 44
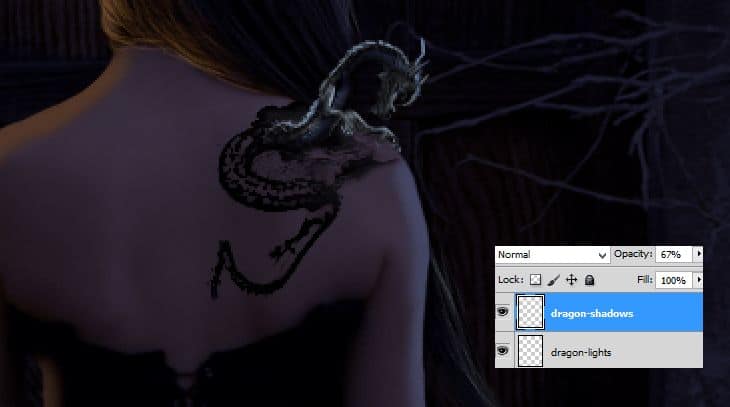
Dragon also have shadow. Add new layer (Shift+Ctrl+N, Layer > New > Layer…, or shortcut). With soft brush, draw some black strokes on his stomach (or something he have :D).
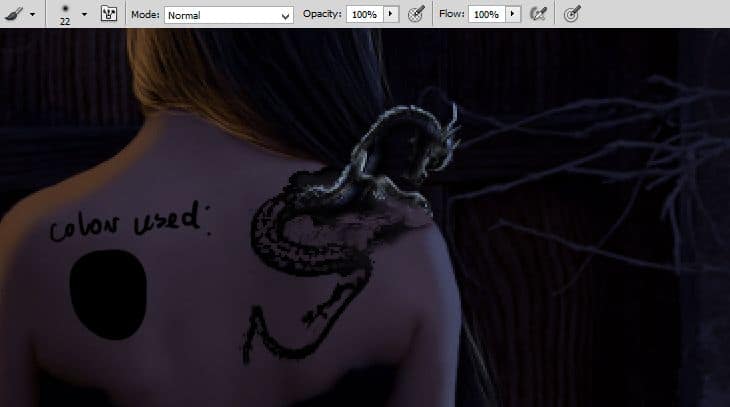
Decrease its opacity to 67%.
Step 45
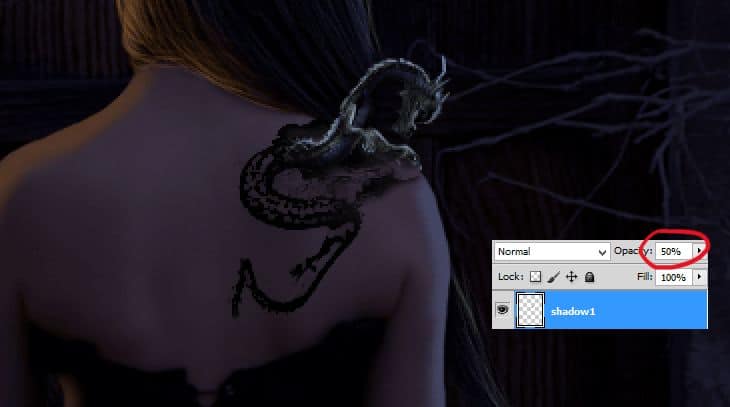
Back below hairs layer. Add new layer (Shift+Ctrl+N, Layer > New > Layer…, or shortcut). Pick soft, 15px, black brush and draw shadow under body of dragon.
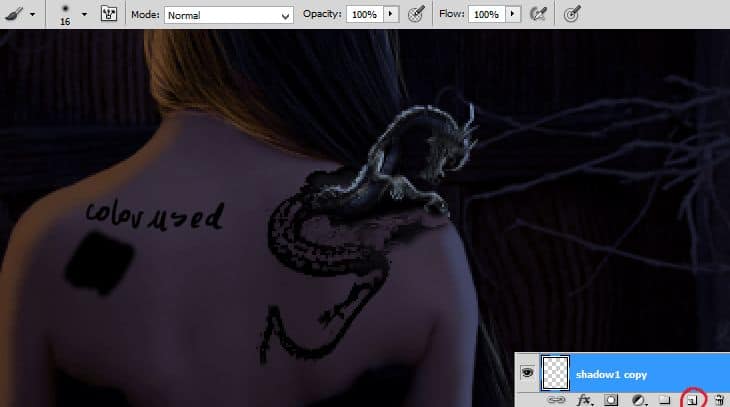
Decrease opacity to 50%.
Step 46
Add new layer. You will draw harder shadows. Pick smaller, soft brush (ex. 5px).
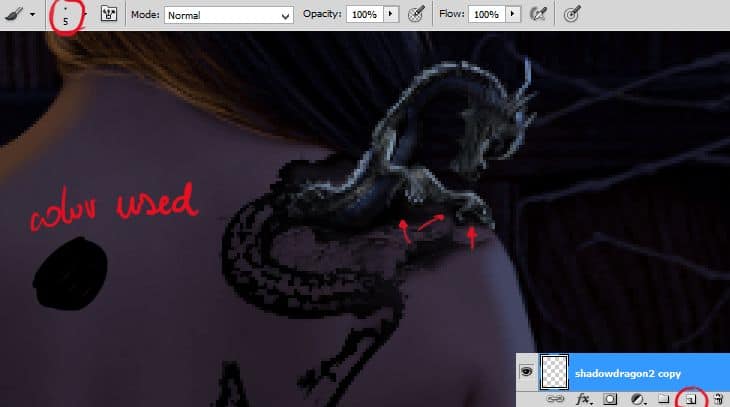
Decrease its opacity to 63%.
Step 47
Add new layer (Shift+Ctrl+N, Layer > New > Layer…, or shortcut). Pick soft, 40px black brush and draw bigger shadow.
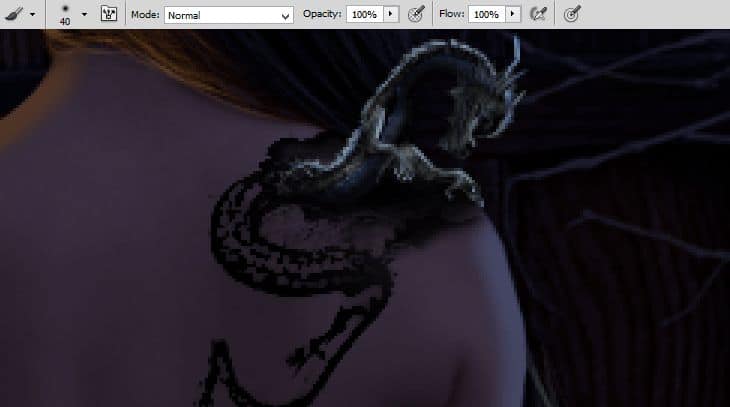
Decrease its opacity to 70%. Change blending mode to Multiply. Keep calm, that was last layer with dragon’s shadow! :)
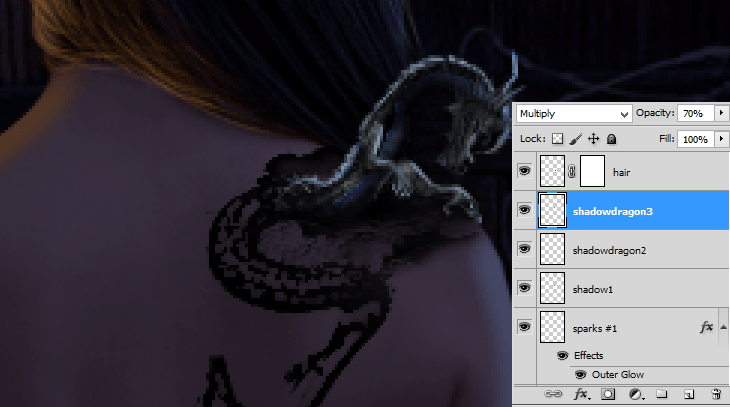
Step 48
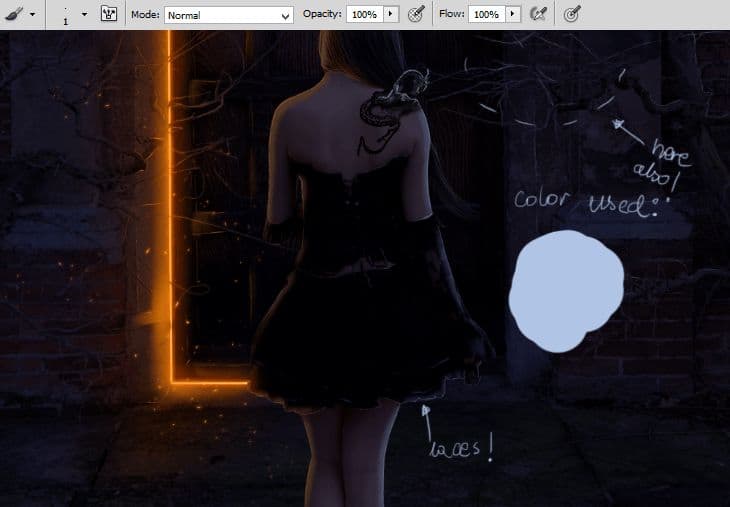
Back on the top of the layers. Add new layer (Shift+Ctrl+N, Layer > New > Layer…, or shortcut) and pick soft, 1px light-orange brush. Draw outline of model’s body. Remember about laces and dress frills.
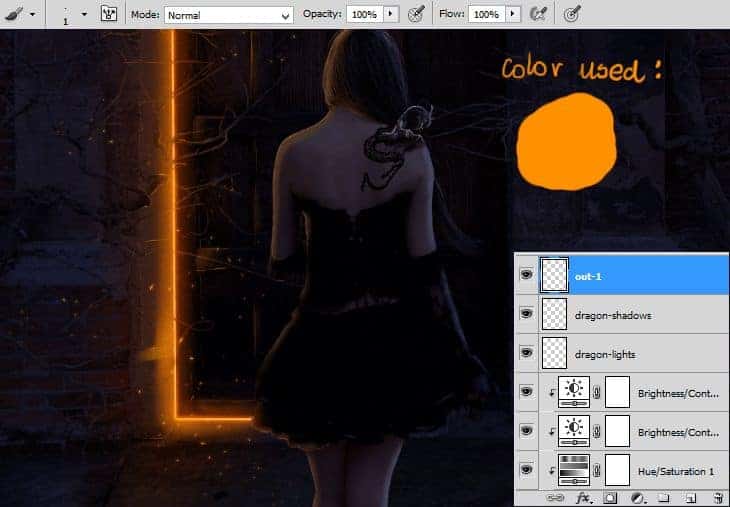
Step 49
Again add new layer (or make it on this one). Pick the same brush. Use light-blue color. Draw the outline on model’s body. I also drew some strokes on branches on the right side.
Step 50
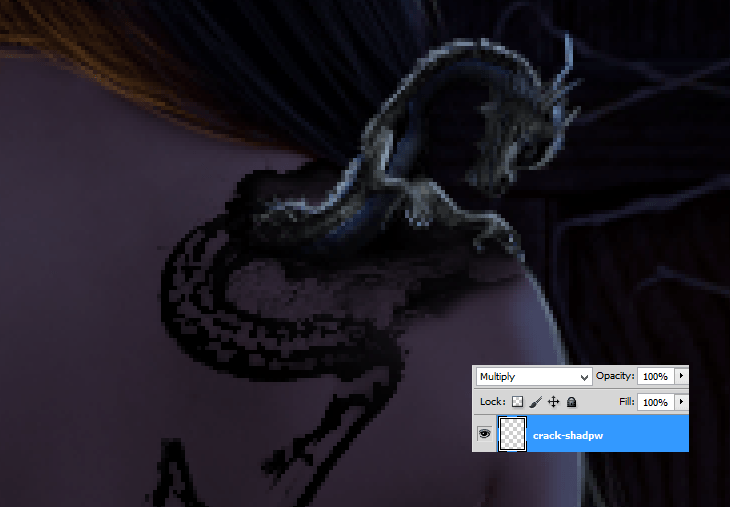
As you can see, dragon isn’t blend so good. Crack should leave shadow on his body. You’ll make it by adding new layer (Shift+Ctrl+N, Layer > New > Layer…, or shortcut). Then, pick 5-7px soft gray brush and draw shadow as is shown.
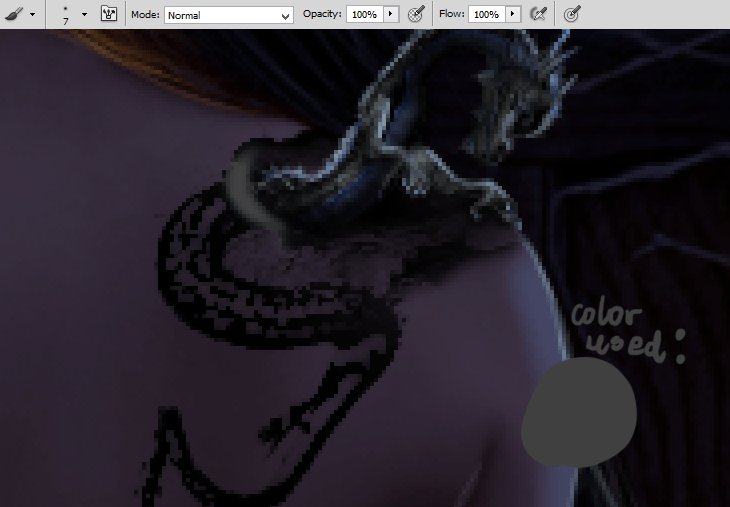
Now change blending mode of this layer to Multiply.
Step 51
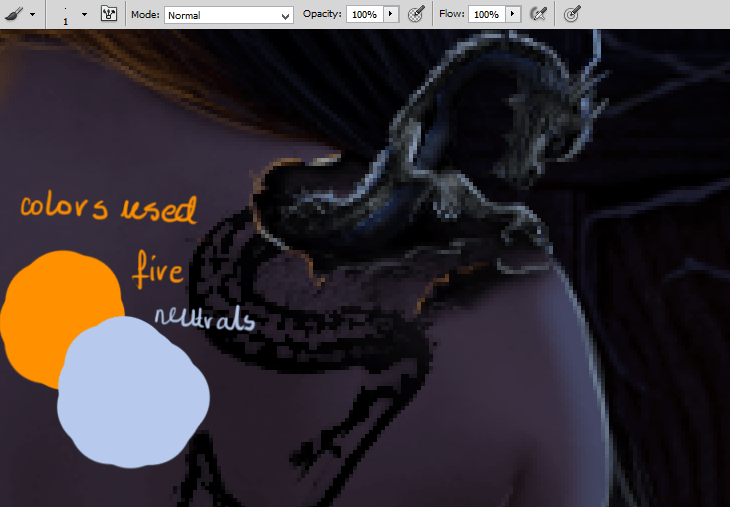
Awesome! I think, crack texture itself is too flatty. For fixing this, create new layer (Shift+Ctrl+N, Layer > New > Layer…, or shortcut), and pick 1px soft brush. Draw some strokes on the edges of crack.
Step 52
You’ll create particles on skin – your work will be more dynamic. Create new layer. Pick Clone Stamp Tool (S). Set any kind of debris/particles brush or use Photoshop preset brush – Rough Round Bristle. Click by holding alt, where it’s marked. Then, click on her skin. Play with it as you want.
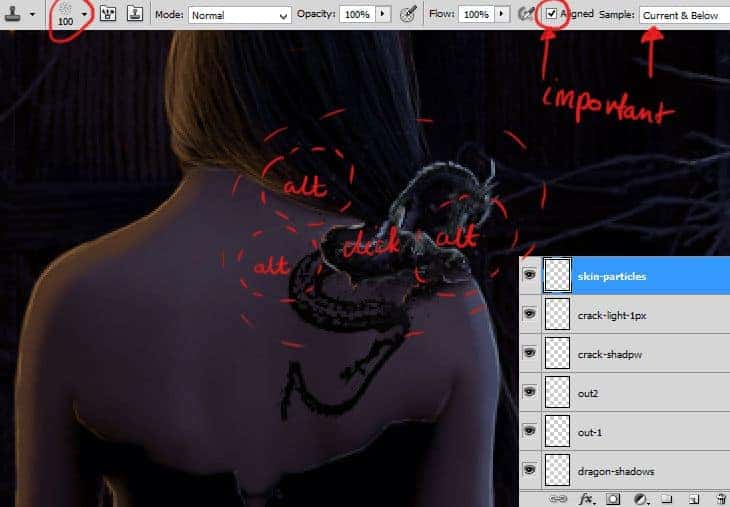
Step 53
Add new layer (Shift+Ctrl+N, Layer > New > Layer…, or shortcut). Do the same as in 52 step, but use bigger brush. Also, you can change brush to any kind with particles/debris/dust, for better effect.
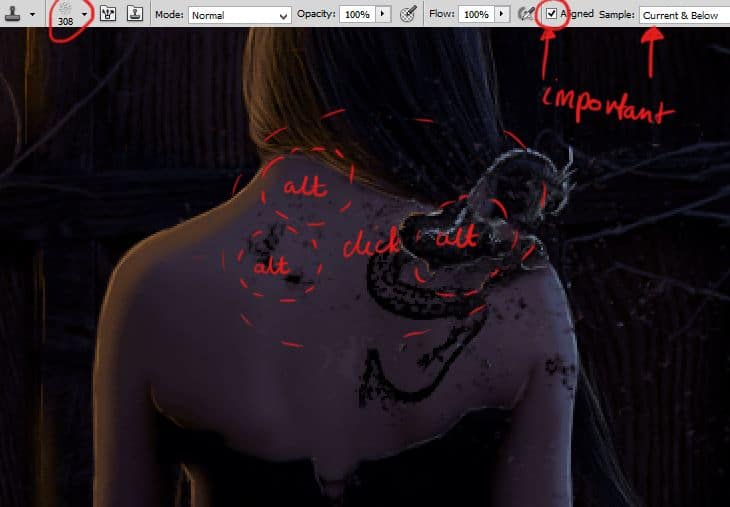
Step 54
At new layer (Shift+Ctrl+N, Layer > New > Layer…, or shortcut). Repeat step 53. Use bigger brush. Then, from top menu choose Filter > Blur > Gaussian blur.
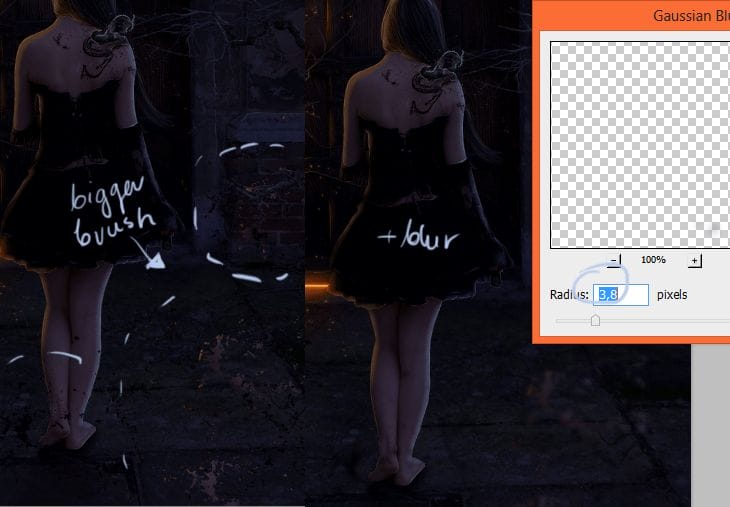
Step 55
For creating sparks just create new layer (Shift+Ctrl+N, Layer > New > Layer…, or shortcut) and draw randomly some dots and small strokes. Use hard, round brush (with pressure size) – 15px, orange. Small arrows will guide you! :)
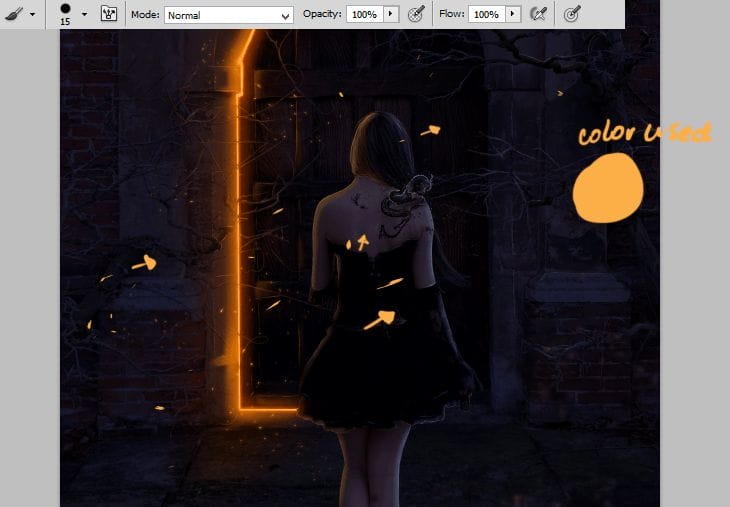
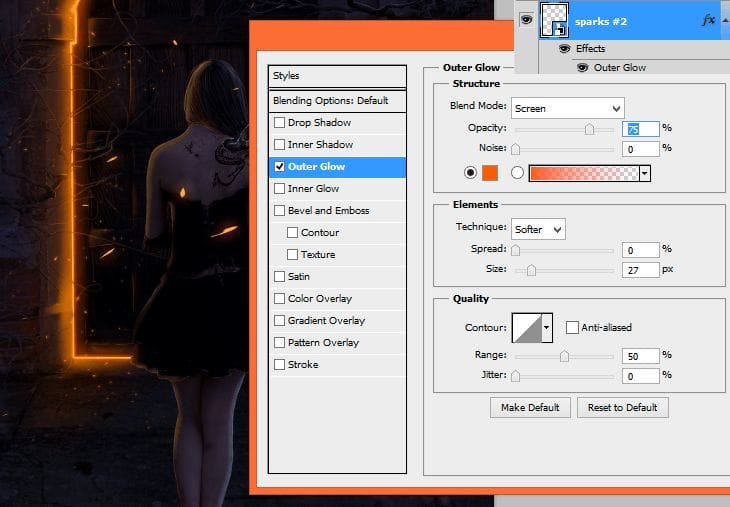
Step 56
Give some glow! Click with RMB on created layer. Go to blending options and check “Outer glow”.
Step 57
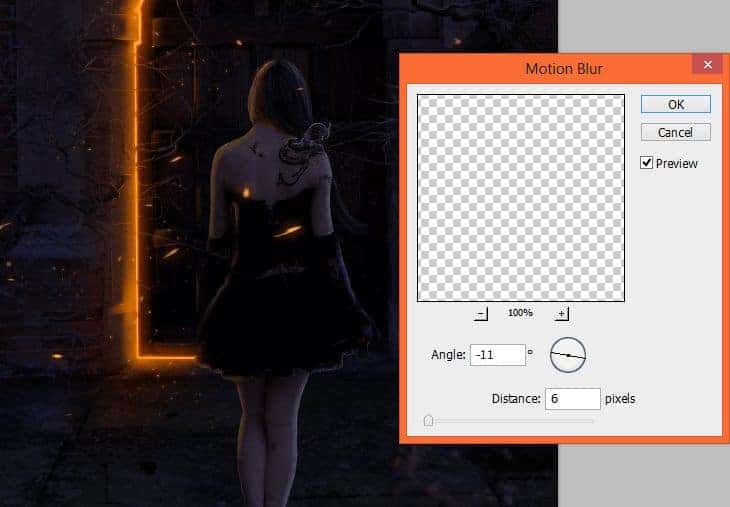
Again, dynamics. From top menu click Filter > Blur > Motion blur. Sparks will be looks like flying around! :).
Step 58
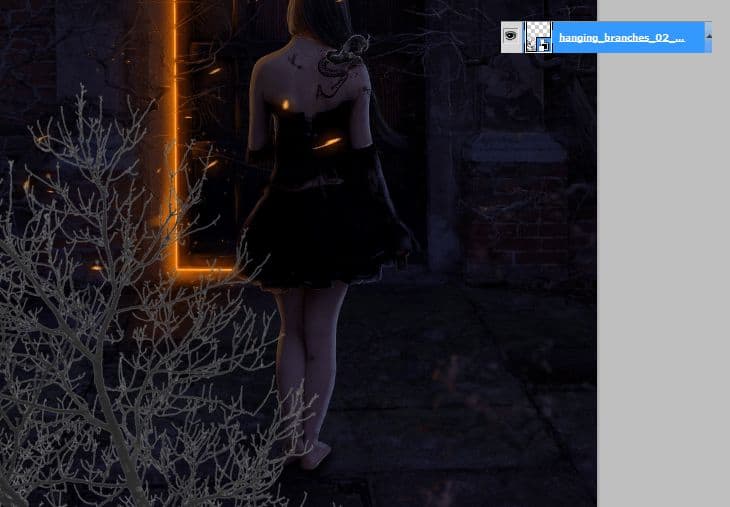
Place “Hanging branches” stock in the left corner of your picture.
Step 59
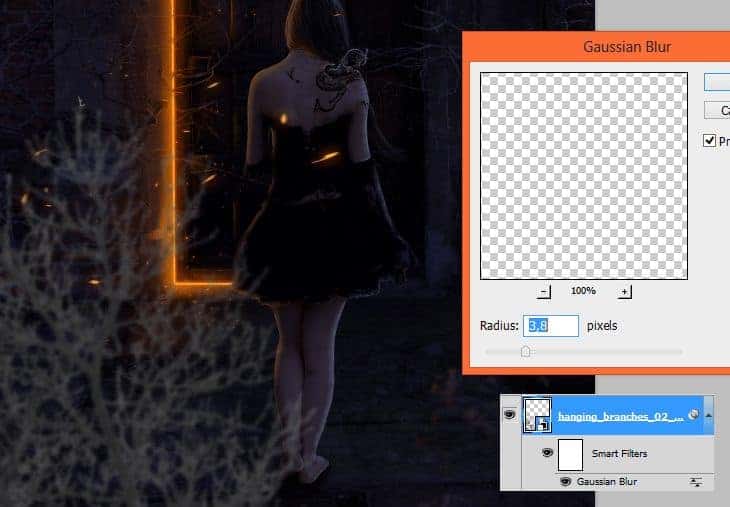
In my desired photo manipulation, branches should be at the first plan. For make it, click Filter > Blur > Gaussian blur, then set it as is shown.
Step 60
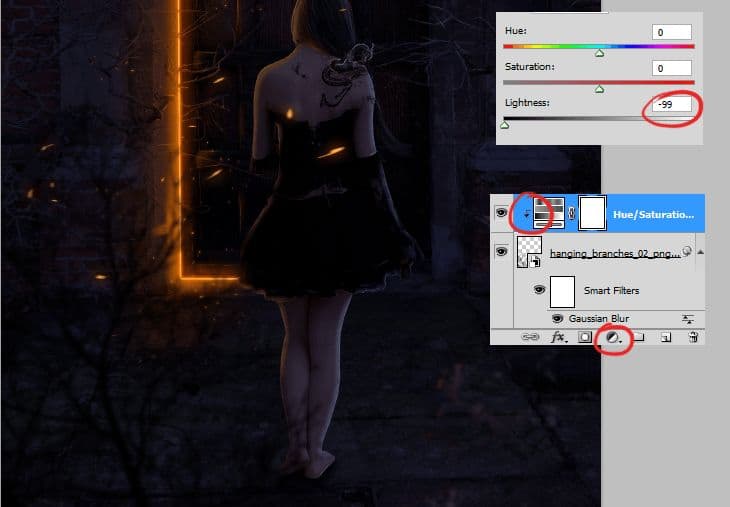
As you can see, stock image is too bright. Fix it by adding Adjustment layer with Hue/Saturation. Then, after setting, click on it with RMB, and choose “Create clipping mask”.
Step 61
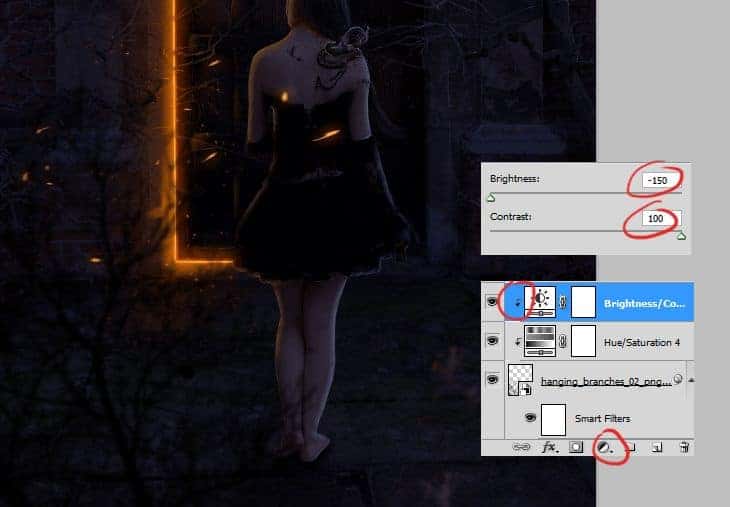
I’ll also fix Brightness/Contrast on this layer. Add adjustment layer with Brightness/Contrast. Then, after setting, click on it with RMB, and choose “Create clipping mask”.
Step 62
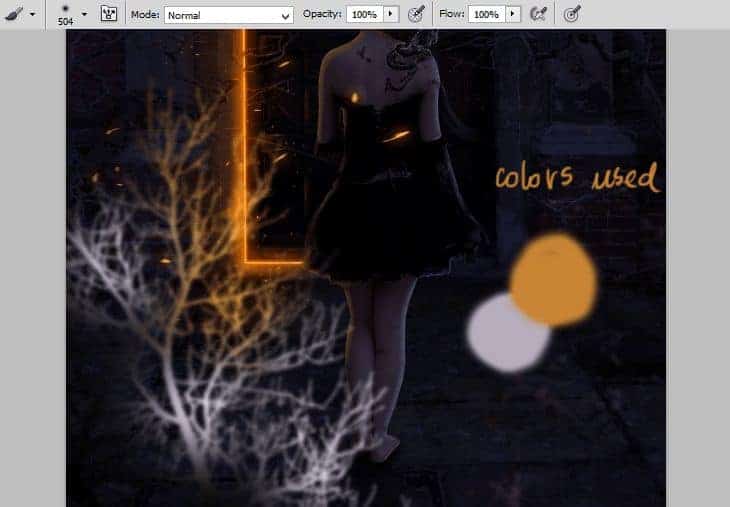
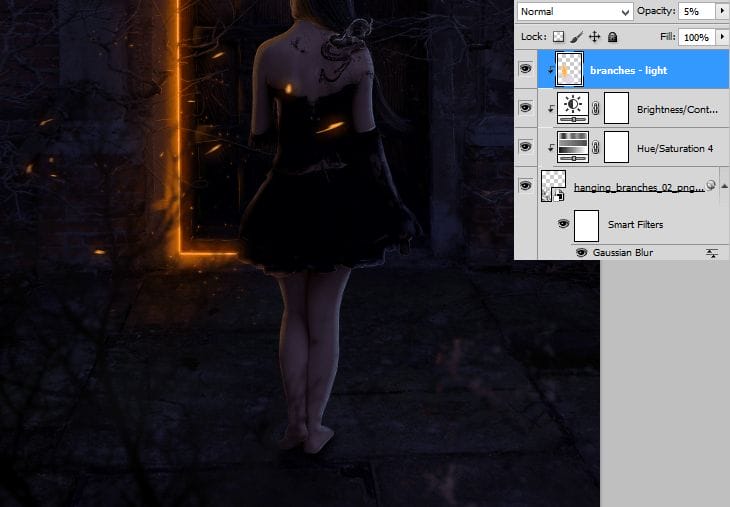
Now add new layer (Shift+Ctrl+N, Layer > New > Layer…, or shortcut), click on it with RMB, and choose “Create clipping mask”. Pick huge, soft brush. Draw strokes near doors – where lights goes.
You should decrease created layer opacity to 5%.
Step 63
So far, so good :). You’ll duplicate group of layers. By holding ctrl mark “Hanging branches” and all layers above. Then, drag and drop it on New layer symbol.
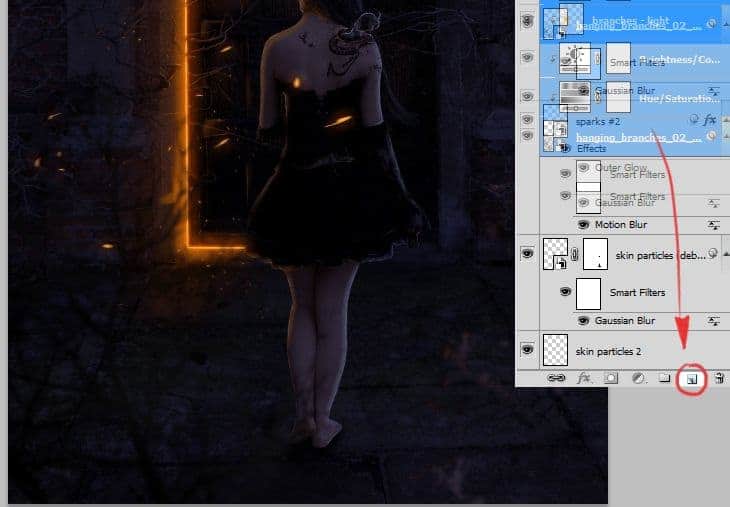
Step 64
From duplicated layer, delete light on branches – drag and drop it to trash icon.
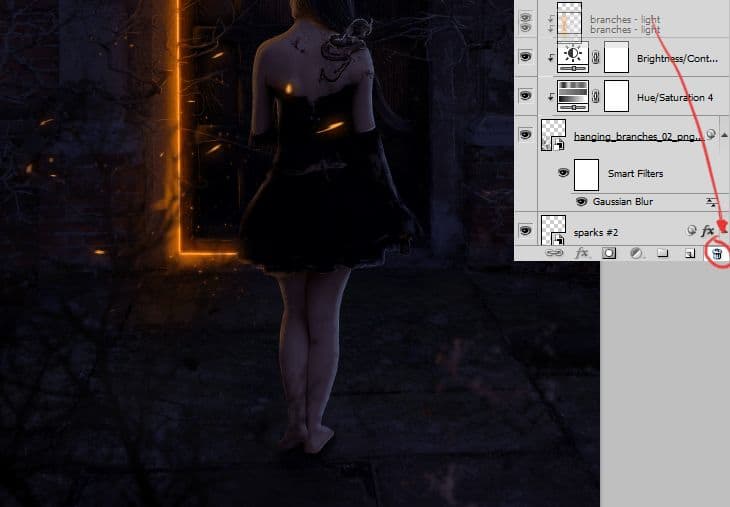
Step 65
Transform duplicated “Hanging branches” as shown.
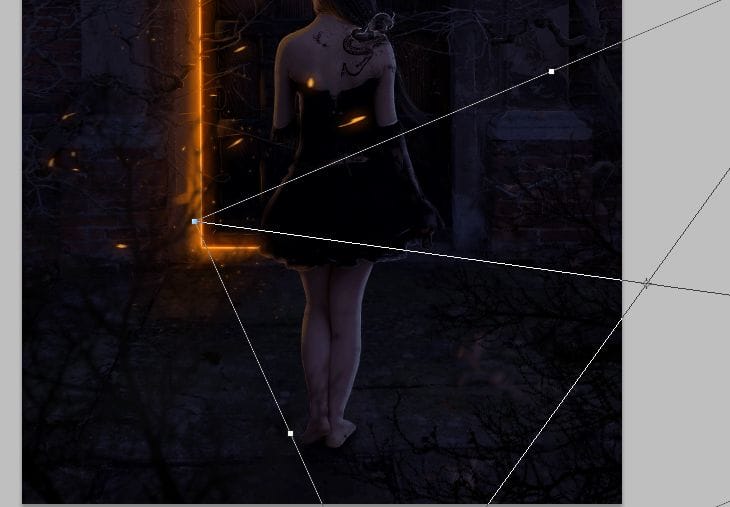
Step 66
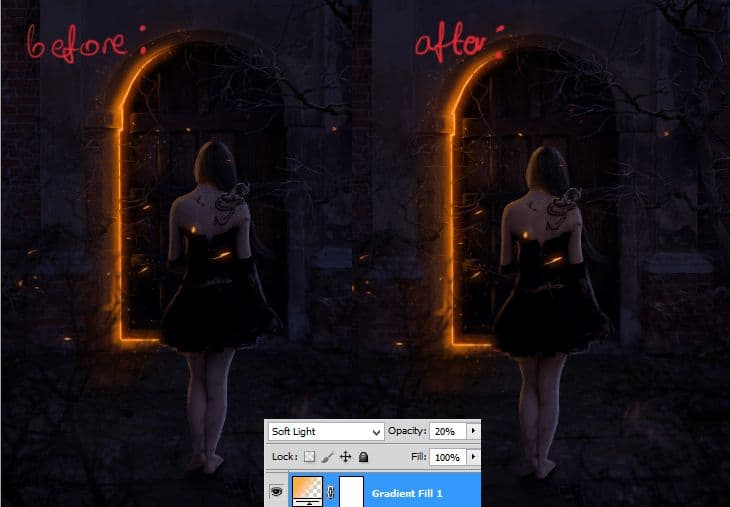
In your color case set #ff9100 color as primary. Then add adjustment layer with Gradient fill (shortcut or Layer > New Adjustment Layer > Gradient Fill).
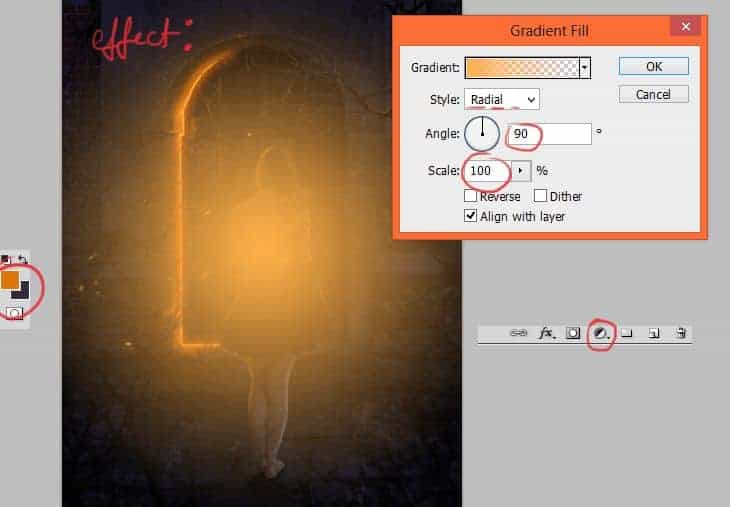
Change blending mode of this layer to Soft light. Decrease opacity to 20%. It will make glow around.
Step 67
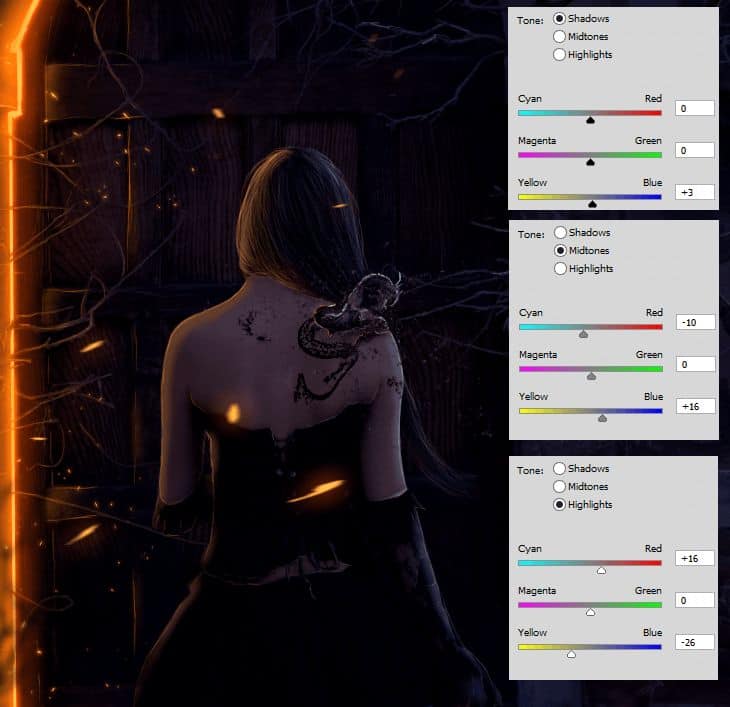
At the end, add adjustment layer with Color/Balance (shortcut or Layer > New Adjustment Layer > Color/Balance). Set it as is shown. You can freely play with this settings, so you can get other results! :).
Final Results
![final-results[1] final-results[1]](http://www.photoshoptutorials.ws/wp-content/uploads/2014/07/finalresults14.jpg)
Born Of The Dragon – Create This Symbolic Gothic Composite In Photoshop >>>>> Download Now
ReplyDelete>>>>> Download Full
Born Of The Dragon – Create This Symbolic Gothic Composite In Photoshop >>>>> Download LINK
>>>>> Download Now
Born Of The Dragon – Create This Symbolic Gothic Composite In Photoshop >>>>> Download Full
>>>>> Download LINK